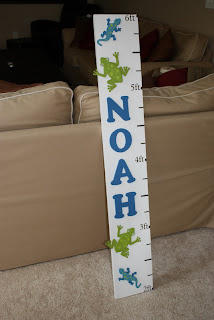
From there, my search took me to a do-it-yourself page by another stay at home mom who made a growth chart out of a piece of lumber and a few materials from her local Michael's. From there, it was a 2 day cinch to gather materials, paint, and use my Cricut to create Noah's growth chart for his room. Here are some of the step by step instructions if interested. Total cost (with lots of paint leftover to make more of these) was around $50. I was really efficient and made a growth chart for my friend's 2 year old birthday gift.
Materials needed:
- good lumber that is 1 inch x 5 in x 4 feet (the other site recommended 3 feet) I found some red oak at Lowe's for around $16
- wood letters for their name (found at JoAnn's around $1-2 a piece depending on size)
- primer
- paint color (I chose white for the base)
- acrylic paint for the letters (super cheap...around 60 cents a bottle!)
- vinyl for the Cricut to cut out numbers
- wooden figurines for decor if you (thought I would have to paint my own animals...but JoAnn's had these animal cut outs painted and ready to go for around $1.29 a piece!)
- picture hanger (large zig-zag size) to install on back
Second step, paint the letters with the acrylic paint. I chose blue to match the lizard figurines I found. I primed the wooden letters too so the paint would stick better.
Third step, let the wood dry overnight. Use the Cricut to cut out vinyl numbers and hyphens to mark your chart. I chose to start at 2 feet and go up to 6 feet with my 4 foot piece of lumber. You may also start at 2 feet and go to 5 feet if you only have a 3 foot piece. Place vinyl at marks. It stuck on really well and was so much easier than hand painting! After that, glue on your letters and animal figurines. I use glue bought at Lowe's called "Gorilla" glue for wood, plastic, and metal. Worked very well and dried clear.*Sidenote: don't forget to install the picture hanger on back
Don't have it up in Noah's room yet...it won't be done until the fall. I'm very pleased and am already thinking about birthday parties coming up to create as gifts!


No comments:
Post a Comment